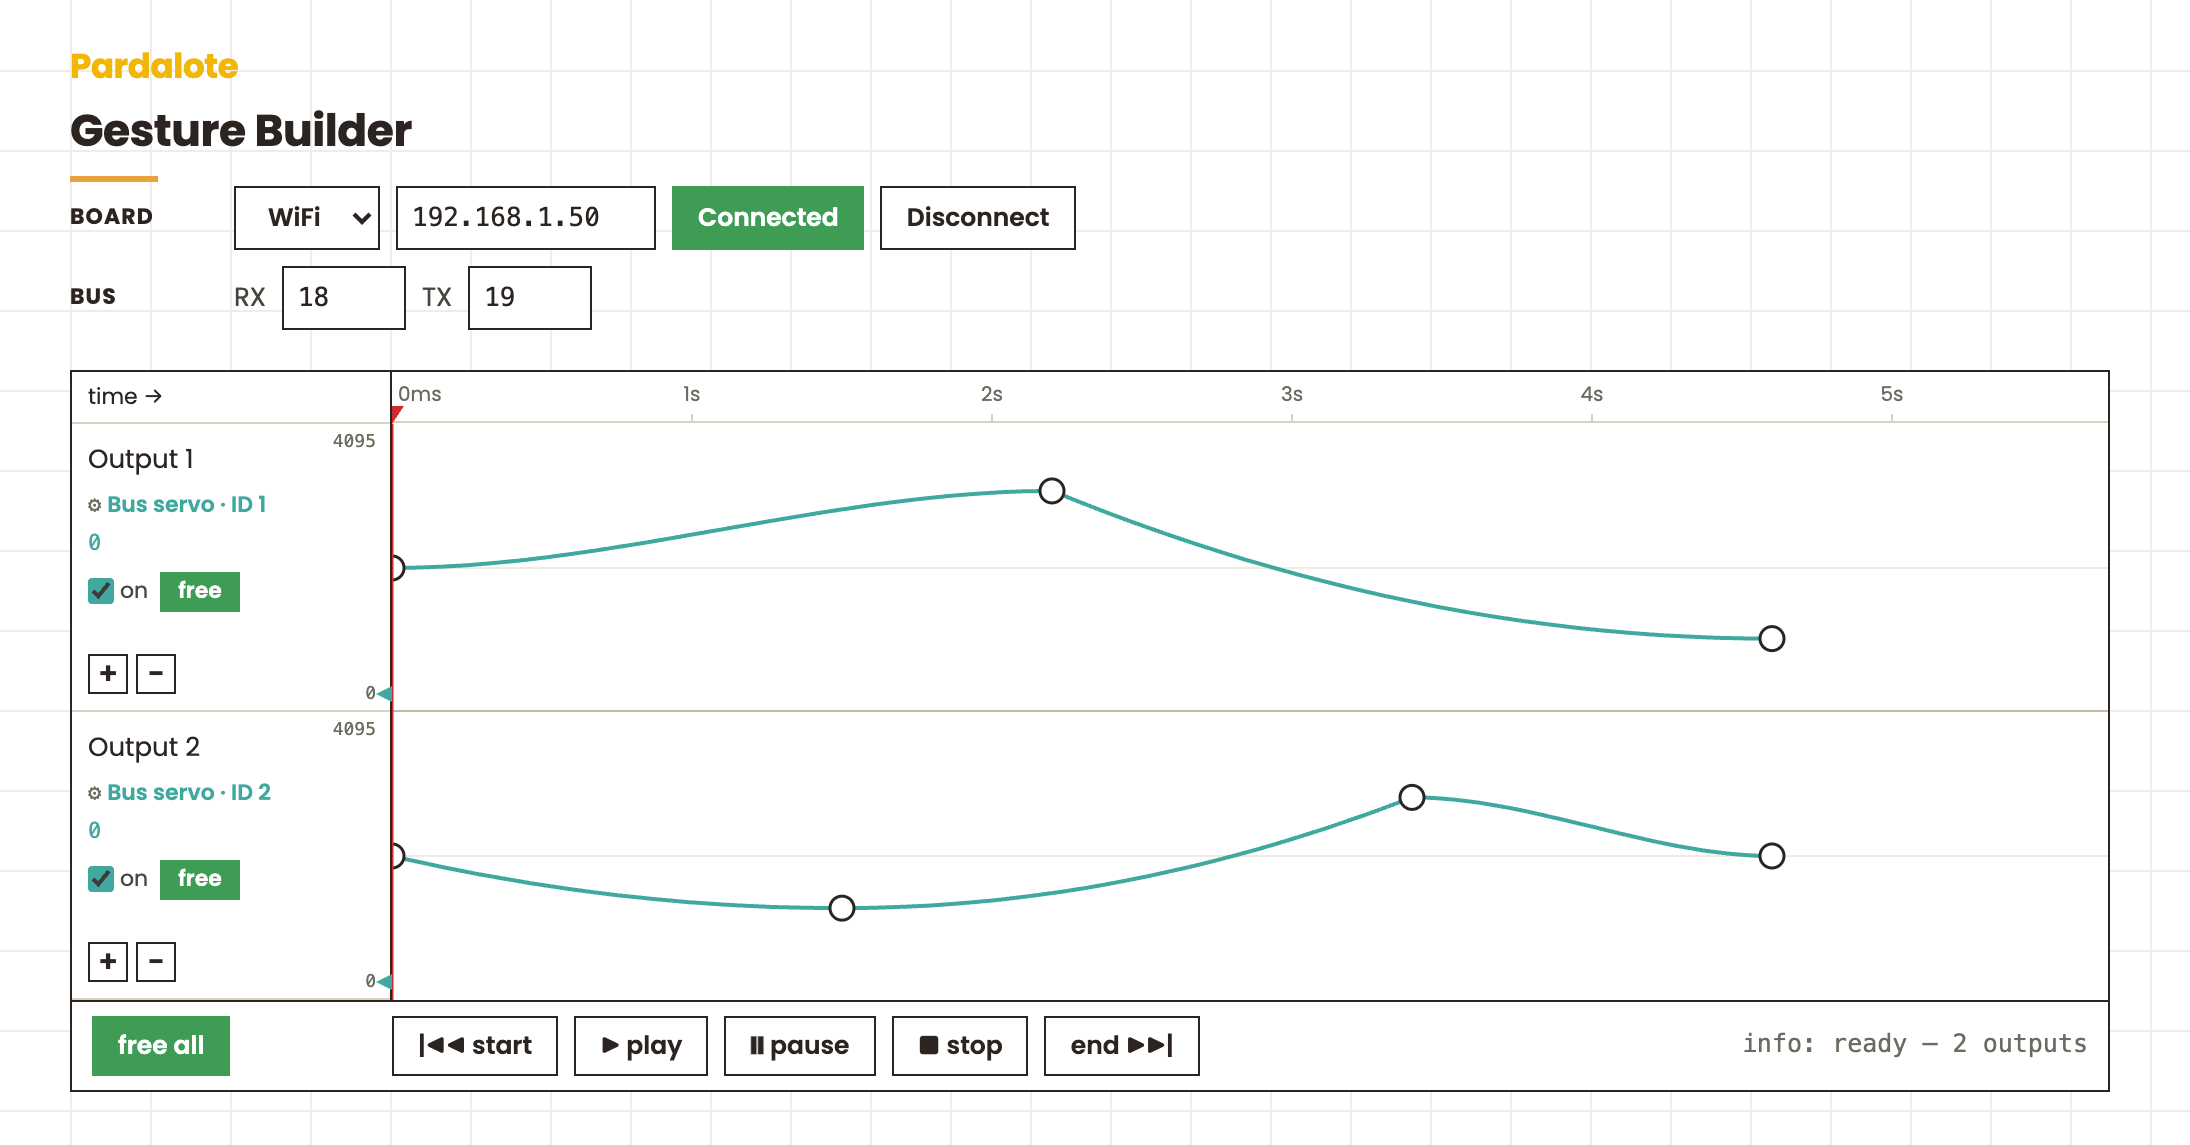
Gesture Builder
Author expressive motion on a timeline, then play it back through Pardalote's
gesture() — an on-board segment schedule each output runs on its own clock.
One web page, one Arduino, any mix of outputs.
Each row is one output (labelled Output N, editable). Click its gutter
summary to open a settings dialog — choose Bus servo, PWM servo, or
Stepper and set its connection pins there; the value axis and units follow the
type (counts / degrees / steps). Each keyframe is a time × a value; the line
between two keyframes is a segment you can shape with an easing curve. Play sends every row as one lane of a single arduino.gesture({…})
so they all start together and arrive together — playing forward from the playhead
you position on the ruler. The playhead is a remote control: drag it any time and
the outputs follow the sequence to that point, live.
Hardware
- One WiFi Arduino — UNO R4 WiFi or ESP32.
- Any mix of outputs the firmware supports:
- Bus servos — Feetech ST-series on a serial-bus driver board, each a distinct bus ID (1–253); a servo supply (6–7.4 V), not the board's 5 V rail. (ESP32 → set the bus RX/TX pins on the page; UNO R4 → Serial1 on D0/D1.)
- PWM servos — a signal Pin each.
- Steppers — a STEP and DIR pin, and optionally an EN (enable) pin
(
-1for none). Only bus servos report position, so pose (hand-authoring) and free are bus-servo features; PWM servos always hold, and steppers free only with an EN pin.
Wiring for bus servos is exactly the Bus servos example.
Arduino
Upload a Pardalote sketch that registers the outputs you'll use — bus servos, PWM
servos, and/or steppers — and note the IP it reports. (The
Coordinated motion example is a ready-made mixed rig — its
sketch already includes the PardaloteServo / PardaloteBusServo / PardaloteStepper
headers, so you can attach whatever mix of outputs you need.) Nothing tool-specific
lives on the board: the timeline is all in the
browser and the board just plays the gestures it's sent, on whatever outputs it has.
Browser
This is a tool — no code editing. Open index.html and:
- Connect (WiFi IP or USB) — the button turns green when it's up.
- For each row, click its gutter summary (⚙ Unassigned on a new row) to open the settings dialog — pick the output type and enter its pins (ID / Pin / STEP·DIR·EN). Add or remove rows with the + / − buttons in the gutter. New rows start unassigned and the fields start blank — the tool never guesses which pin or ID your hardware is on. Until a row is fully set up it's held off (its on box is locked) and never talks to the board — you can still sketch its motion (on a 0–100 % scale, converted when you pick a type). Fill in the last field and it switches on.
- Build the motion on the timeline:
| Action | What it does |
|---|---|
| click a row's gutter summary | open the settings dialog — output type + connection pins (draggable; OK keeps, cancel/Esc revert) |
| double-click a lane | add a keyframe at that time and value |
| drag a keyframe | set its value (up/down) and time (left/right). If the output isn't free, its motor follows the edit live — but only when the edit changes the value at the playhead (drag a keyframe the playhead sits on, or a segment touching it; otherwise the motor holds) |
| right-click a keyframe | delete it, or pose servo (bus servos only) — free the servo, hand-move it, click to commit (Esc cancels) |
| right-click a segment | set its shape (easing) — linear / easeIn / easeOut / easeInOut / back |
| drag the last keyframe past the right edge | extend the timeline |
| drag a max / min value (gutter) | set that output's soft limit (the value axis spans min–max, in the type's unit) |
| right-click a max / min value | reset to the type's default range — or (bus servos only) pose limits by sweeping the range by hand |
| drag the playhead (ruler) | drive the outputs to that point in the sequence, live — a remote control (grabbing it during play takes over). Play resumes from wherever it rests |
| ▶ play | play the sequence forward from the playhead (one batched arduino.gesture({…})). Every output keeps to the schedule; when playback ends the info line says done, or names any output that couldn't reach its last key within 2 s and gave up, and where it stopped |
| ■ stop | cancel the gesture and hold where it is — the playhead stays put (the robot doesn't rewind) |
| |◀◀ start / end ▶▶| | send the playhead and the outputs to the start / end |
| free / free all | release an output's torque to hand-pose it — bus servos and steppers-with-EN only (greyed otherwise) |
The teal marker in each row's gutter is that output's live position (sensed for bus servos; last-commanded for PWM servos and steppers). Everything (rows, keyframes, shapes, connection) is remembered per browser.
Export — and import
Four code panels below the timeline. For each language, the gesture panel is the
definition (one segment array per output) and is editable; the example use panel
beside it is a read-only, self-contained runnable program — it includes the gesture data
inline plus setup and connection (or setup()/loop()), so you can copy that one panel and
run it as-is. Switched-off rows (including ones whose output isn't set up yet) are omitted, matching what
play sends.
It's two-way. Edit the numbers in a gesture panel — or paste in a definition you saved earlier — and click away: the timeline rebuilds from it, and every other panel (and the other language) regenerates to match. So you can bring an already-authored gesture back in and keep editing it visually. The definition is the source of truth: each lane matches an existing row by name (keeping its output type / pins / limits), a lane you add becomes a new unassigned row (its values kept as written — pick its output after), and a lane you remove drops that row. If the code can't be read, the timeline is left untouched and the panel reverts.
- JavaScript — just the gesture object
{ … }(one segment array per output, keyed by yourarduino.add(name, …)names), so you can paste it wherever your code wants it — e.g.const nod = { … };. The example stores it asconst gesture = { … };, connects, attaches, and plays it witharduino.gesture(gesture, { absolute: true }). - C++ (board-side) — the gesture as
static const PardaloteSeg …Segs[]schedules in flash; the example is a full sketch (setup()/loop(),attach()) that includes those arrays and plays them withPardalote.gesture().add(…).play()(orPardalote<Type>.gesture(id, segs, count)for one output).
Editing either language's definition rewrites the timeline — and the other language follows.
How it works
Each row becomes a gesture(). A row's keyframes are turned into an absolute
segment schedule — a lead-in from the servo's live position to the first keyframe,
then one segment per gap. Each segment carries the left keyframe's easing curve:
// row points [{t, v, curve}, …]  →  gesture segments (values in servo counts)
const segs = [{ to: pts[0].v, dur: pts[0].t, curve: 'linear' }];
for (let i = 1; i < pts.length; i++)
    segs.push({ to: pts[i].v, dur: pts[i].t - pts[i-1].t, curve: pts[i-1].curve });

servo.gesture(segs, { absolute: true });
All rows play together. Instead of firing each gesture() separately, the
rows are sent as one multi-channel arduino.gesture({…}) — a single batched
message where every channel starts together, and shorter lanes are padded with a
trailing hold so every servo arrives together:
arduino.gesture({ seq0: segsA, seq1: segsB }, { absolute: true });
(The keys are the actuator names you passed to arduino.add(name, …). Under the
hood this runs through a transient group; when you're
already holding a named group for live control, group.gesture() does the same.)
The preview uses the same easing math as the board (curveShape()), so the
shape you draw on screen is the shape the schedule encodes.
Notes
- Angles are raw ST encoder counts under the hood (0–4095 over a nominal 360°); the read-outs show degrees.
- Board limits: up to 12 segments per servo and (here) 10 keyframes per row — plenty for a gesture, and it keeps room for the group's arrive- together padding.
- Bus servos render the curve on the board. A Feetech bus servo takes a
(position, speed) target and runs its own move, so — unlike a PWM
Servo, whose controller takes a raw angle — Pardalote renders the easing with a board-side streaming interpolator: it samples the curve on a fixed clock and streams look-ahead setpoints (batched across a group into one phase-locked write). The shape you draw, overshoot included, is the shape the servo runs — no need to hand-decompose a move into extra keyframes to fake it. (A segment shorter than ~600 ms plays linear — too brief to render an easing shape, and imperceptibly so.)