Motion sensor (IMU)
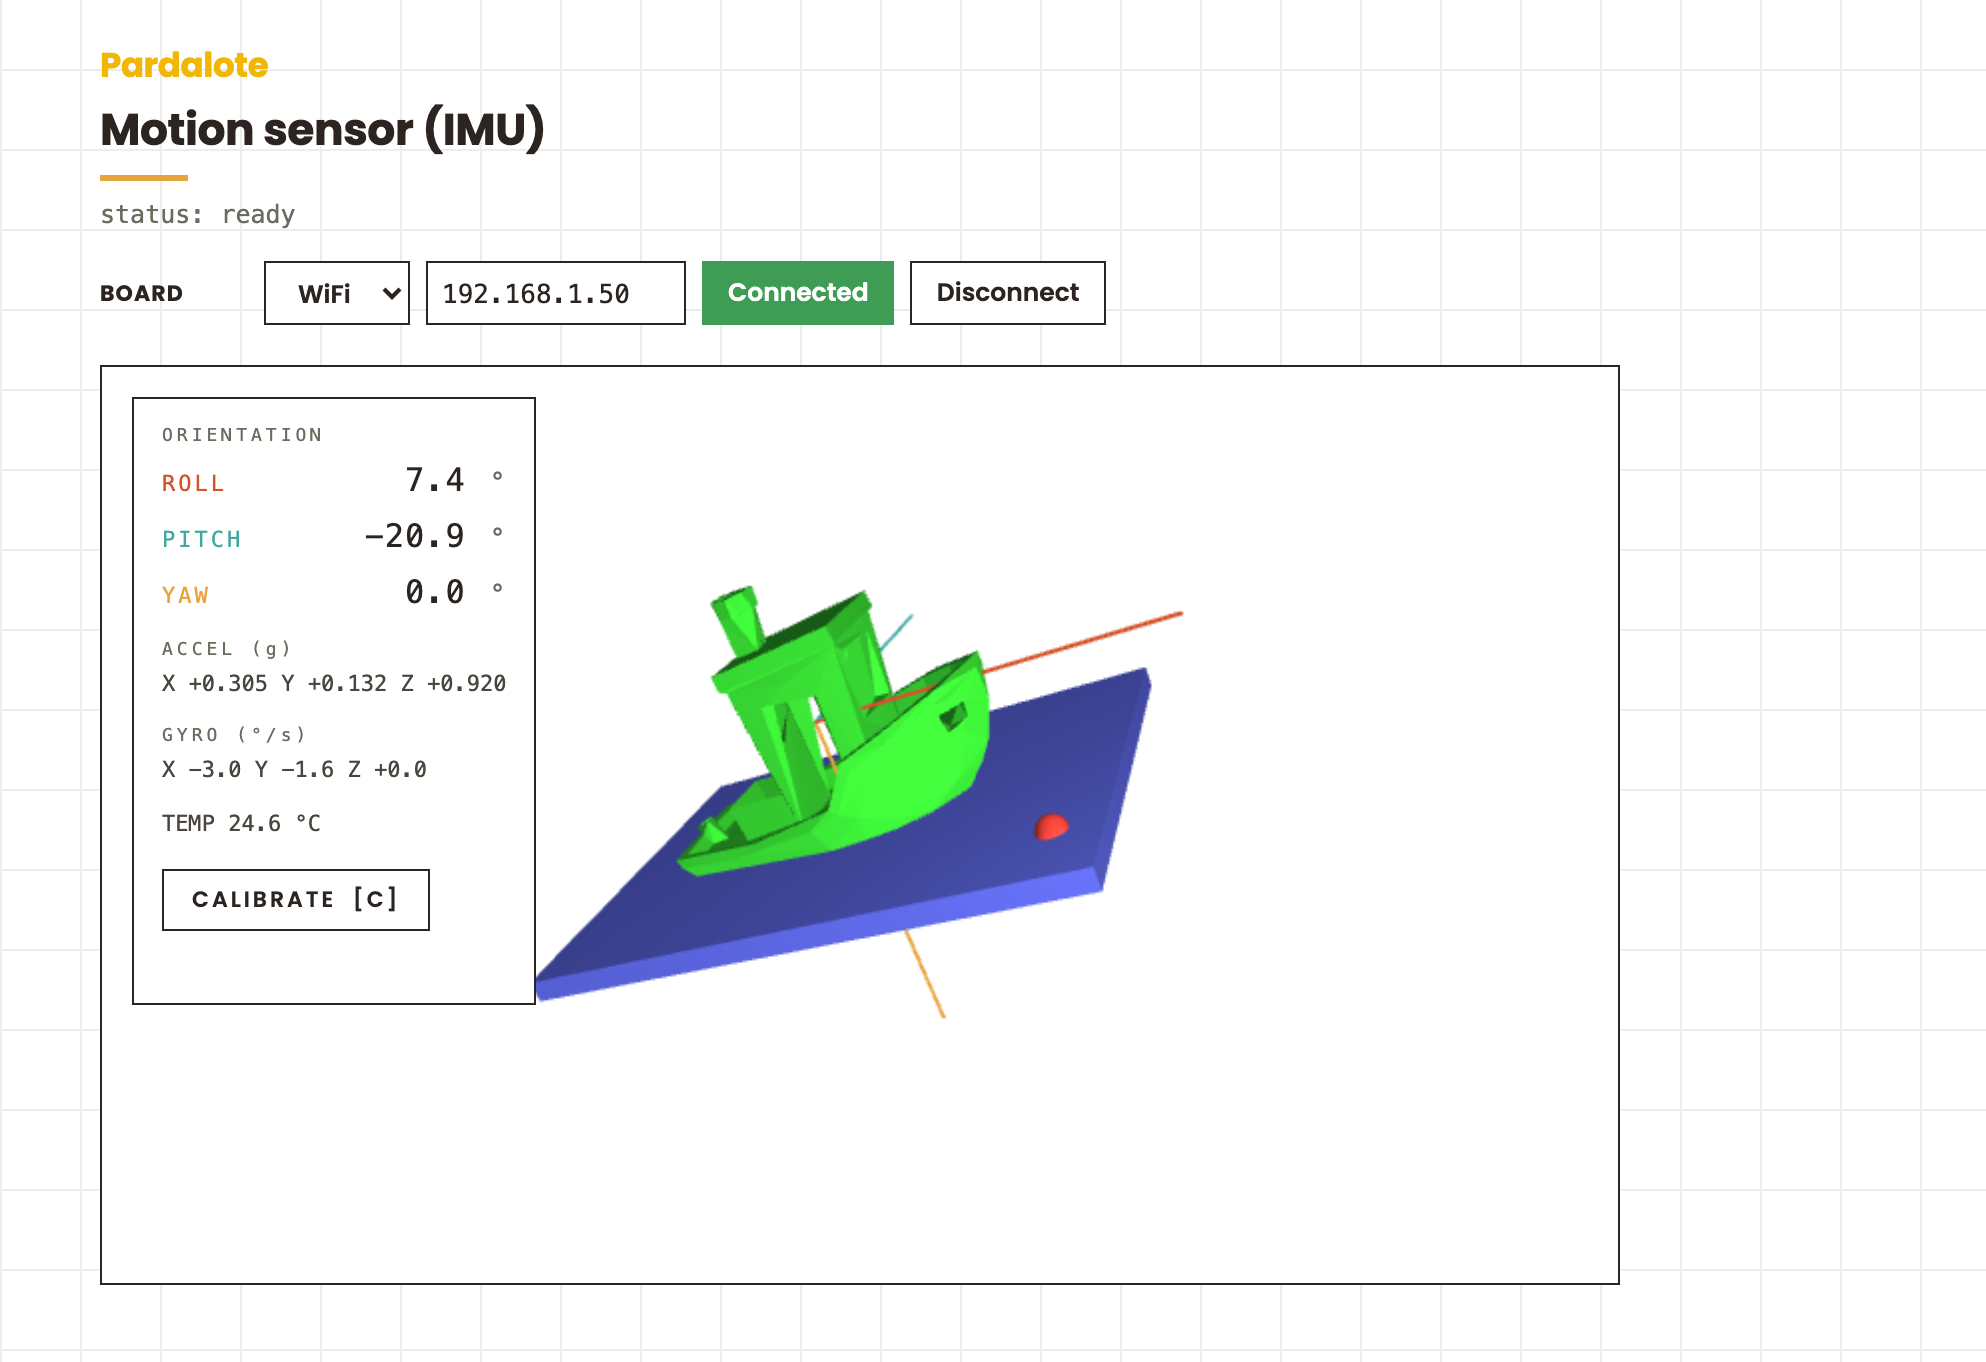
A p5.js sketch that reads a 6-DOF inertial measurement unit and renders a live 3D model that rotates with the physical sensor in all three axes. Roll, pitch and yaw are shown on a HUD overlay.
#include <Pardalote.h>
#include <PardaloteIMU.h>

void setup() {
    Pardalote.begin();
}

void loop() {
    Pardalote.run();
}
const ADDR = 0x68;     // I²C address (0x69 if AD0 → 3V3)
// SDA/SCL are the ESP32 I²C pins (software-definable via Wire.begin). A UNO R4
// uses its fixed hardware SDA/SCL and ignores these.
const SDA = 21;
const SCL = 22;

const POLL_MS = 50;    // sensor poll interval ms (50 Hz)
// Filter blend factor. Higher → trusts gyro more (responsive but drifts);
// lower → trusts accel more (stable but noisy during motion).
const ALPHA = 0.96;

const W = 760, H = 460;   // 3D view size

// ── State ────────────────────────────────────────────────────
let arduino;
let roll = 0, pitch = 0, yaw = 0;   // radians
let lastT = 0;                      // timestamp of previous reading (ms)
let myModel;

function preload() {
    // Load the 3D model and normalize (scale) it. .obj and .stl are supported.
    myModel = loadModel('lowest-poly-benchy-utkdesign.stl', true);
}

// ── p5 setup ─────────────────────────────────────────────────
function setup() {
    const cnv = createCanvas(W, H, WEBGL);
    cnv.parent('stage');
    pixelDensity(1);
    perspective(PI / 4, W / H, 1, 5000);

    arduino = new Arduino();
    arduino.add('imu', new IMU('6050'));
    setupConnection(arduino, { store: 'pardalote-imu' });

    // Attach the IMU once the board is ready (device state resets on reconnect).
    arduino.on('ready', () => {
        arduino.imu.attach(ADDR, SDA, SCL);   // I²C address, then ESP32 SDA/SCL (UNO R4 ignores these)
        arduino.imu.onChange(onReading);
        arduino.imu.onCalibrate(onCalibrate);
        arduino.imu.read(POLL_MS);
    });
}

// ── Main draw loop ────────────────────────────────────────────
function draw() {
    background(255);   // house paper

    // Camera — slightly above and to the right for a natural 3D view
    camera(180, -220, 560, 0, 0, 0, 0, 1, 0);

    // Scene lighting — brighter ambient for the white background
    ambientLight(120);
    directionalLight(190, 190, 185, -0.4, -0.9, -0.5);
    pointLight(240, 225, 190, 220, -180, 280);

    // Apply sensor orientation (aerospace convention: yaw → pitch → roll).
    rotateY(yaw);
    rotateX(-roll);
    rotateZ(pitch);

    drawPlane();

    // Render the loaded model
    translate(0, -65, 0);
    rotateX(PI / 2);
    noStroke();
    fill('#30bf30');
    model(myModel);

    drawAxes(200);
}

// ── 3D model ──────────────────────────────────────────────────
function drawPlane() {
    push();
    noStroke();
    fill('#5864e7');
    box(310, 12, 248);
    // Orientation marker — sphere at the +X edge (axis-1 on the silkscreen)
    translate(130, -6, 80);
    fill('#e8433d');
    sphere(8);
    pop();
}

// Coordinate axes — orange = X, teal = Y, amber = Z (match the HUD labels)
function drawAxes(len) {
    push();
    strokeWeight(2);
    noFill();
    stroke('#D3542B'); line(0, 0, 0, len, 0, 0);      // X — board long edge
    stroke('#3FA9A0'); line(0, 0, 0, 0, -len, 0);      // Y — board short edge (−Y is up)
    stroke('#E8A33D'); line(0, 0, 0, 0, 0, -len);      // Z — out of the board top
    pop();
}

// ── Sensor callback ───────────────────────────────────────────
function onReading({ accel, gyro, temp }) {
    const now = millis();
    const dt  = lastT ? (now - lastT) / 1000 : 0;
    lastT = now;

    // Tilt from gravity — good long-term reference, noisy during motion.
    const aRoll  = Math.atan2(accel.y, accel.z);
    const aPitch = Math.atan2(-accel.x, Math.sqrt(accel.y ** 2 + accel.z ** 2));

    // Complementary filter: gyro integration + slow accel correction.
    const toRad = Math.PI / 180;
    roll  = ALPHA * (roll  + gyro.x * toRad * dt) + (1 - ALPHA) * aRoll;
    pitch = ALPHA * (pitch + gyro.y * toRad * dt) + (1 - ALPHA) * aPitch;
    // Yaw — pure gyro integration (no magnetometer, so it drifts; press 'c' to zero).
    yaw  += gyro.z * toRad * dt;

    const rollDeg  = degrees(roll);
    const pitchDeg = degrees(pitch);
    const yawDeg   = ((degrees(yaw) % 360) + 540) % 360 - 180;   // wrap ±180°

    id('roll-val').textContent  = fmt(rollDeg);
    id('pitch-val').textContent = fmt(pitchDeg);
    id('yaw-val').textContent   = fmt(yawDeg);
    id('accel').textContent = `X ${fmtV(accel.x)} Y ${fmtV(accel.y)} Z ${fmtV(accel.z)}`;
    id('gyro').textContent  = `X ${fmtV(gyro.x, 1)} Y ${fmtV(gyro.y, 1)} Z ${fmtV(gyro.z, 1)}`;
    id('temp').textContent  = `TEMP  ${temp.toFixed(1)} °C`;
}

function onCalibrate() {
    // Reset the filter so stale angles don't persist; yaw zeroes too.
    roll = 0; pitch = 0; yaw = 0; lastT = 0;
    id('cal-msg').textContent = 'Calibration complete';
    setTimeout(() => { id('cal-msg').textContent = ''; }, 3000);
}

// ── UI ────────────────────────────────────────────────────────
function doCalibrate() {
    if (!arduino?.imu?.isAttached) return;
    id('cal-msg').textContent = 'Calibrating… keep sensor flat and still';
    arduino.imu.calibrate(200);  // 200 samples ≈ 400 ms
}

function keyPressed() {
    if (key === 'c' || key === 'C') doCalibrate();
}

// ── Helpers ───────────────────────────────────────────────────
const id = sel => document.getElementById(sel);

// Right-align a 1-decimal number in a fixed-width field (incl. sign space)
function fmt(n, width = 7) {
    return (n >= 0 ? ' ' : '') + n.toFixed(1).padStart(width);
}
// Value with explicit sign and 3 decimal places — for sensor readouts
function fmtV(n, dp = 3) {
    return (n >= 0 ? '+' : '') + n.toFixed(dp);
}
What This Example Does
- Polls the IMU at 20 Hz (every 50 ms by default — gentle on UNO R4 WiFi and older ESP32 boards)
- Computes roll and pitch via a complementary filter that combines gyroscope integration (fast response) with accelerometer tilt (gravity-anchored drift correction)
- Computes yaw via pure gyro integration. The MPU-6050 has no magnetometer, so there's no gravity-like reference for heading — yaw will drift a few degrees per minute and only
c-calibration resets it - Renders a 3D model in WEBGL that rotates to match the physical sensor orientation in all three axes
- Displays roll, pitch, yaw, accelerometer, gyroscope, and temperature readings live with color-coded axis labels (red/green/blue → X/Y/Z)
- Supports in-browser calibration with a button or the
Ckey
Hardware Requirements
- Arduino UNO R4 WiFi or ESP32 development board
- MPU-6050 (or other supported IMU — see below)
- Arduino and browser must be on the same WiFi network
Wiring (MPU-6050 → Arduino)
| Sensor pin | Arduino |
|---|---|
| VCC | 3.3 V |
| GND | GND |
| SDA | SDA pin |
| SCL | SCL pin |
| AD0 | GND (sets address to 0x68) |
Note: Most Arduino boards have dedicated SDA and SCL pins. On the UNO R4 WiFi these are A4/A5; on ESP32 boards they vary — check your pinout. On ESP32 you can use any GPIO pair with the optional
sda/sclparams.
Arduino libraries
Install via Arduino IDE → Tools → Manage Libraries:
WebSocketsServer(by Markus Sattler)
No separate IMU library is required — PardaloteIMU.h reads the sensor registers directly over I2C.
Install Pardalote itself by copying pardalote-arduino/library/Pardalote/ into your Arduino libraries folder (see the top-level README).
Supported Sensors
The IMU extension supports multiple sensor families. Pass the model name to the constructor:
| Model string | Chip | DOF | Default address |
|---|---|---|---|
'6050' |
InvenSense MPU-6050 | 6 | 0x68 |
'6500' |
InvenSense MPU-6500 | 6 | 0x68 |
'9250' |
InvenSense MPU-9250 | 9 | 0x68 |
'9255' |
InvenSense MPU-9255 | 9 | 0x68 |
'LSM6DS3' |
STMicro LSM6DS3 | 6 | 0x6A |
'LSM6DSOX' |
STMicro LSM6DSOX | 6 | 0x6A |
The I²C address is set by the sensor's AD0 (MPU) / SA0 (LSM6) pin: tie
it to GND for the default (0x68), or to 3V3 to shift it up by one (0x69) —
handy for two sensors on one bus. Set the address at the top of sketch.js (const ADDR).
The SDA/SCL pins are software-definable on ESP32 (Pardalote passes them
to Wire.begin(sda, scl)), so the page's SDA/SCL fields let you pick any pair.
On UNO R4 the I²C pins are fixed hardware, so those fields lock automatically
when an R4 connects.
Quick Start
1. Upload the firmware
-
In Arduino IDE: File → Examples → Pardalote → IMU. The sketch is two lines:
Arduino#include <Pardalote.h> #include <PardaloteIMU.h> void setup() { Pardalote.begin(); } void loop() { Pardalote.run(); } -
Select your board and upload
-
Open the Serial Monitor at 115200 baud — on first boot Pardalote asks for your WiFi credentials:
=== Pardalote ===
No WiFi networks stored.
=== WiFi Configuration ===
[a]dd  [d]elete  [c]lear all  [s]how  [x] exit
> a
SSID: YourWiFiName
Password: ********
Saved: YourWiFiName
> x
Credentials are saved to EEPROM and survive re-uploads. Press
win the Serial Monitor at any point while the board is trying to connect to update them.Prefer compile-time credentials? Create a
secrets.hfile in the sketch folder with:Arduino#define SECRET_SSID "YourWiFiName" #define SECRET_PASS "YourWiFiPassword" -
Find your Arduino's IP address:
- UNO R4 WiFi: scrolls across the LED matrix
- ESP32: printed in the Serial Monitor
2. Open the example and connect
Open index.html in a browser. In the Board row, enter the Arduino's IP
(or switch to USB) and press Connect — your choice is remembered per
browser. The I²C address (0x68 with AD0 → GND, 0x69 with AD0 → 3V3) and,
on ESP32, the SDA/SCL pins are set at the top of sketch.js (const ADDR /
const SDA / const SCL; a UNO R4 ignores SDA/SCL — it uses its fixed hardware
pins). Tilt the sensor — the 3D model should follow.
(This page targets the MPU-6050. To use a different sensor model in your own
copy, change the constructor argument in sketch.js, e.g.
new IMU('LSM6DS3'), and set the matching ADDR.)
How It Works
const ADDR = 0x68, SDA = 21, SCL = 22;   // I²C address (0x69 if AD0 HIGH); ESP32 SDA/SCL

arduino = new Arduino();
arduino.add('imu', new IMU('6050'));
setupConnection(arduino, { store: 'pardalote-imu' });   // Board row + connection (connect.js)

arduino.on('ready', () => {
    arduino.imu.attach(ADDR, SDA, SCL);   // address, then ESP32 SDA/SCL (UNO R4 ignores these)
    arduino.imu.onChange(onReading);      // fires each time a reading arrives
    arduino.imu.onCalibrate(onCalibrate);
    arduino.imu.read(POLL_MS);            // start polling
});
Each reading delivers { accel, gyro, temp }:
function onReading({ accel, gyro, temp }) {
    // accel: { x, y, z }  in g
    // gyro:  { x, y, z }  in °/s
    // temp:                in °C
}
Complementary filter (roll & pitch)
The raw accelerometer gives a stable tilt angle but is noisy during movement. The gyroscope gives smooth, fast response but drifts over time. The complementary filter blends them — gyro integration dominates short-term response; accelerometer tilt slowly pulls the estimate back toward the true gravity-down direction:
const ALPHA = 0.96;  // 96% gyro, 4% accel correction

roll  = ALPHA * (roll  + gyro.x * toRad * dt) + (1 - ALPHA) * aRoll;
pitch = ALPHA * (pitch + gyro.y * toRad * dt) + (1 - ALPHA) * aPitch;
Increase ALPHA for faster response (more gyro trust, more drift). Decrease it for more stability (more accel, noisier during motion).
Yaw (pure gyro integration)
yaw += gyro.z * toRad * dt;
No accelerometer correction is possible — gravity tells you which way is down, but doesn't tell you which way is north. The MPU-6050 has no magnetometer, so yaw drifts. Press C to recalibrate and zero it back to its reference heading.
Calibration
Click the CALIBRATE button or press C while the sensor is flat and still. The Arduino collects 200 samples (~400 ms) and computes offset corrections. After calibration:
- Accel: x ≈ 0 g, y ≈ 0 g, z ≈ +1 g (gravity preserved)
- Gyro: x ≈ 0, y ≈ 0, z ≈ 0
Offsets are stored on the Arduino and re-sent to any browser that reconnects — you don't need to calibrate again after a page reload.
Tuning the orientation
If the 3D model rotates in the wrong direction, flip the sign in draw(). The current sketch uses aerospace order (yaw → pitch → roll):
rotateY(yaw);     // → rotateY(-yaw)    to flip heading direction
rotateX(-roll);   // → rotateX(roll)    to flip left/right tilt
rotateZ(pitch);   // → rotateZ(-pitch)  to flip forward/back tilt
For non-standard sensor mounting, you may also need to swap which gyro axis feeds which angle in the filter calculation.
Changing the poll rate
const POLL_MS = 50; // 50 ms = 20 Hz
Lower values give smoother motion but use more I²C bandwidth and WiFi. On the UNO R4 WiFi and older ESP32 boards (WROVER class) keep this at 50 ms or higher — faster polling can hang the I²C bus on those chips. Newer ESP32-S3 / C3 boards can handle 20 ms (50 Hz) reliably.
Script loading order
Include the pardalote.js bundle (core + every extension) before your sketch:
<script src="../../lib/pardalote.js"></script>
<script src="sketch.js"></script>
Troubleshooting
"IMU not responding"
- Check SDA and SCL wiring; confirm the I2C address (AD0/SA0 state)
- Check Serial Monitor for
IMU WHO_AM_I mismatch— this means the wrong model string was passed or the wiring is incorrect - Verify the sketch has
#include <PardaloteIMU.h>
"3D model drifts over time when stationary"
- For roll/pitch drift: normal gyro bias — run calibration. The accelerometer correction factor
ALPHAgradually pulls the angle back; lowering it (e.g. to 0.90) makes correction faster at the cost of more noise during motion - For yaw drift specifically: this is unavoidable on the MPU-6050 (no magnetometer). A few degrees per minute is normal. Press
Cto recalibrate and zero the heading
"Board hangs after a few seconds"
- Most common on UNO R4 WiFi and older ESP32 boards (WROVER class). The I²C peripheral can stall under sustained high-rate reads. Raise
POLL_MSto 50 or higher
"Readings are noisy during fast motion"
- Normal — accelerometer tilt angles are unreliable when the board is accelerating
- Increase
ALPHAslightly so the filter trusts the gyro more during motion
"Temperature reading seems wrong"
- The MPU-6050 die temperature runs ~10–15 °C above ambient — this is expected
- Use it for relative drift compensation, not as an ambient thermometer
"Arduino won't connect"
- Check the IP address in
sketch.js - Arduino and browser must be on the same WiFi network
File Structure
IMU/
├── index.html      # Canvas page (loads p5.js and the pardalote.js bundle)
├── sketch.js       # IMU setup, complementary filter, 3D render
├── connect.js      # Board connection UI (WiFi / USB, remembered per browser)
├── style.css       # Dark HUD overlay
└── README.md       # This file

dist/
└── pardalote.js    # Pardalote bundle (core + all extensions)
Next Steps
- Change model:
new IMU('9250')for a 9-DOF MPU-9250 - Two sensors on the same bus: use different addresses (0x68 and 0x69) and
arduino.add('imu1', new IMU('6050')),arduino.add('imu2', new IMU('6050')) - Set accel/gyro range:
arduino.imu.setAccelRange(4)(±4g),arduino.imu.setGyroRange(1000)(±1000°/s) - Use on ESP32 with custom I2C pins:
arduino.imu.attach(0x68, 21, 22) - Build a full AHRS by adding a magnetometer reading from a 9-DOF variant